How To Install Wireguard in ClearLinux
WireGuard is my choice which is in ClearLinux KVM inside my HomeLab server due to this fast, modern and secure VPN tunnel.
WireGuard is my choice which is in ClearLinux KVM inside my HomeLab server due to this fast, modern and secure VPN tunnel.
WireGuard® is an extremely simple yet fast and modern VPN that utilizes state-of-the-art cryptography. It aims to be faster, simpler, leaner, and more useful than IPsec, while avoiding the massive headache. It intends to be considerably more performant than OpenVPN. WireGuard is designed as a general purpose VPN for running on embedded interfaces and super computers alike, fit for many different circumstances. Initially released for the Linux kernel, it is now cross-platform (Windows, macOS, BSD, iOS, Android) and widely deployable. It is currently under heavy development, but already it might be regarded as the most secure, easiest to use, and simplest VPN solution in the industry.
In addition, I will also use WireGuard VPN over IPsec for my embedded Linux development with QuecOpen IoT modules from Quectel.
ClearLinux WireGuard configuration
At time of writing, my ClearLinux is running kernel 5.9.9 which integrated Wireguard kernel module. For other distribution where kernel < 5.6, can check the detail guide.
$ uname -a
Linux tux 5.9.9-1001.native #1 SMP Wed Nov 18 15:02:45 PST 2020 x86_64 GNU/Linux
1) Install wireguard-tools - include wg and wg-quick utilities are main userspace tooling for using and configuring WireGuard tunnels
sudo swupd bundle-add network-basic2) To let peer access the network of a VPN server - meaning connect to Internet or to access all my local HomeLab IP, need to enable IP fowarding.
sysctl -w net.ipv4.ip_forward=1
sysctl -w net.ipv6.conf.all.forwarding=1
3) Setup traffic rules to accept all UDP traffic via port 51820 and also accept conntrack traffics
## IPTables track connections
iptables -A INPUT -m conntrack --ctstate RELATED,ESTABLISHED -j ACCEPT
iptables -A FORWARD -m conntrack --ctstate RELATED,ESTABLISHED -j ACCEPT

## Setup Wireguard
iptables -A INPUT -p udp -m udp --dport 51820 -m conntrack --ctstate NEW -j ACCEPT
This setting is very important, otherwise other peer can't connect to WireGuard peer.
To save iptables configuration permanently, you need to check this doc as we are using iptables or:
# Save firewall config
sudo systemctl start iptables-save

# Enable iptables-restore, so config can be loaded at booting time
sudo systemctl enable iptables-restore.service
4) Create a Wireguard configuration. Just keep it for now, as we can just use the config generator or you can follow WireGuard quick start to create config manually.
For testing purpose, you can adjust config /etc/wireguard/wg0.conf at server, client to test.
An example Client configuration file (change EndPoint address to your sever IP):
[Interface]
PrivateKey = 8GboYh0YF3q/hJhoPFoL3HM/ObgOuC8YI6UXWsgWL2M=
Address = 10.10.10.2/32
DNS = 192.168.1.254

[Peer]
PublicKey = OwdegSTyhlpw7Dbpg8VSUBKXF9CxoQp2gAOdwgqtPVI=
AllowedIPs = 0.0.0.0/0
Endpoint = vpn.example.com:51820
An example Server configuration file (change DNS to your router IP):
[Interface]
Address = 10.10.10.1/24
DNS = 192.168.1.254
ListenPort = 51820
PrivateKey = YNqHwpcAmVj0lVzPSt3oUnL7cRPKB/geVxccs0C0kk0=
[Peer]
PublicKey = CLnGaiAfyf6kTBJKh0M529MnlqfFqoWJ5K4IAJ2+X08=
AllowedIPs = 10.10.10.2/32
5) Start wg-quick@wg0service to create wireguard network and listens to the peer:
sudo systemctl enable [email protected]
sudo systemctl start [email protected]
6) Last step, I need to open port 51820 that point to the ClearLinux KVM (192.168.11.20). In my router running OpenWrt, this can be done:
config redirect
	option dest_port '51820'
	option src 'wan'
	option name 'WireGuard-VPN'
	option src_dport '51820'
	option target 'DNAT'
	option dest_ip '192.168.11.20'
	option dest 'lan'
	list proto 'udp'
Now check the network, clients info using sudo wg and this is done :)
Wireguard Config Generator
In fact, we can manually create peer configuration using Wireguard Quick Start, however we need to have a fancy GUI where can manage clients and display QR code, ... You can try whatever tools that do this job of generating Wireguard file /etc/wireguard/wg0.conf.
Tested several Wireguard GUI, wireguard-ui is kind of the best one, even still missing some features like user management, ... Bring up this GUI at port 5000 and point output to /etc/wireguard very easy using Docker-compose:
version: '3'

services:
  wg:
    image: ngoduykhanh/wireguard-ui:latest
    container_name: wgui
    ports:
      - 5000:5000
    logging:
      driver: json-file
      options:
        max-size: 50m
    volumes:
      - db:/app/db
      - /etc/wireguard:/etc/wireguard
volumes:
  db:
There are few configuration parameters that need to be configured to reflect your system configuration at http://server_ip:5000 with default login admin/admin. You need to check result of your GUI configuration at /etc/wireguard/wg0.conf
Global settings
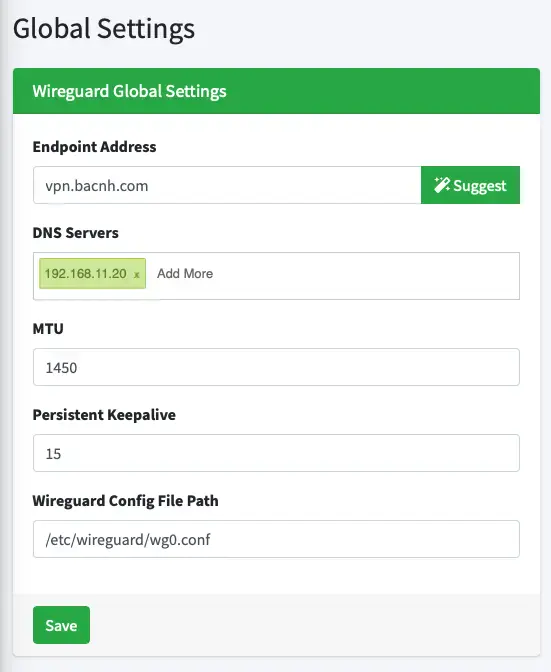
- Enpoint Address is your VPN public IP where your client can see it. It could be your public Wan IP, however can be used a fancy domain like vpn.bacnh.com - where point to server
- DNS Servers: could be either Google DNS
8.8.8.8or Cloudflare DNS1.1.1.1. In my case, it points to PiHole IP192.168.11.20so all clients can enjoy Ads blocking - Wireguard Config File Path: /etc/wireguard/wg0.conf - place where WireGuard configuration is generated when press button Apply Config and this path is mapped with same host location.
Wireguard Server
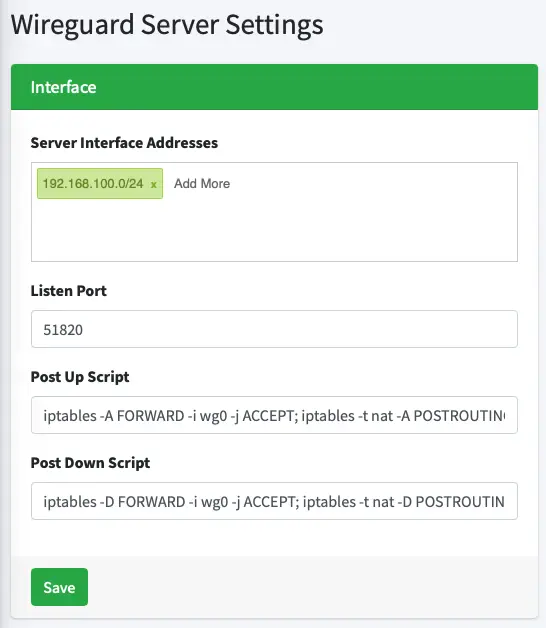
- Server Interface Addresses: it is the IP address range WireGuard peers used to communicate with each other. Change it to your prefered network range
- Listen port: WireGuard listen port of the host - in my case just set default port
51820. This port need to be forwarded via the router, so other peers can see and communicate with this peer (VPN Server) - PostUp/PostDown Script: enter scripts to forward and nat to
wg0interfaceens18. Remember to changeens18to main host network interface (you can check the network name withip addr)
# Post Up Script
iptables -A FORWARD -i wg0 -j ACCEPT; iptables -t nat -A POSTROUTING -o ens18 -j MASQUERADE; ip6tables -A FORWARD -i wg0 -j ACCEPT; ip6tables -t nat -A POSTROUTING -o ens18 -j MASQUERADE
# Post Down Script
iptables -D FORWARD -i wg0 -j ACCEPT; iptables -t nat -D POSTROUTING -o ens18 -j MASQUERADE; ip6tables -D FORWARD -i wg0 -j ACCEPT; ip6tables -t nat -D POSTROUTING -o ens18 -j MASQUERADE
# Save rules
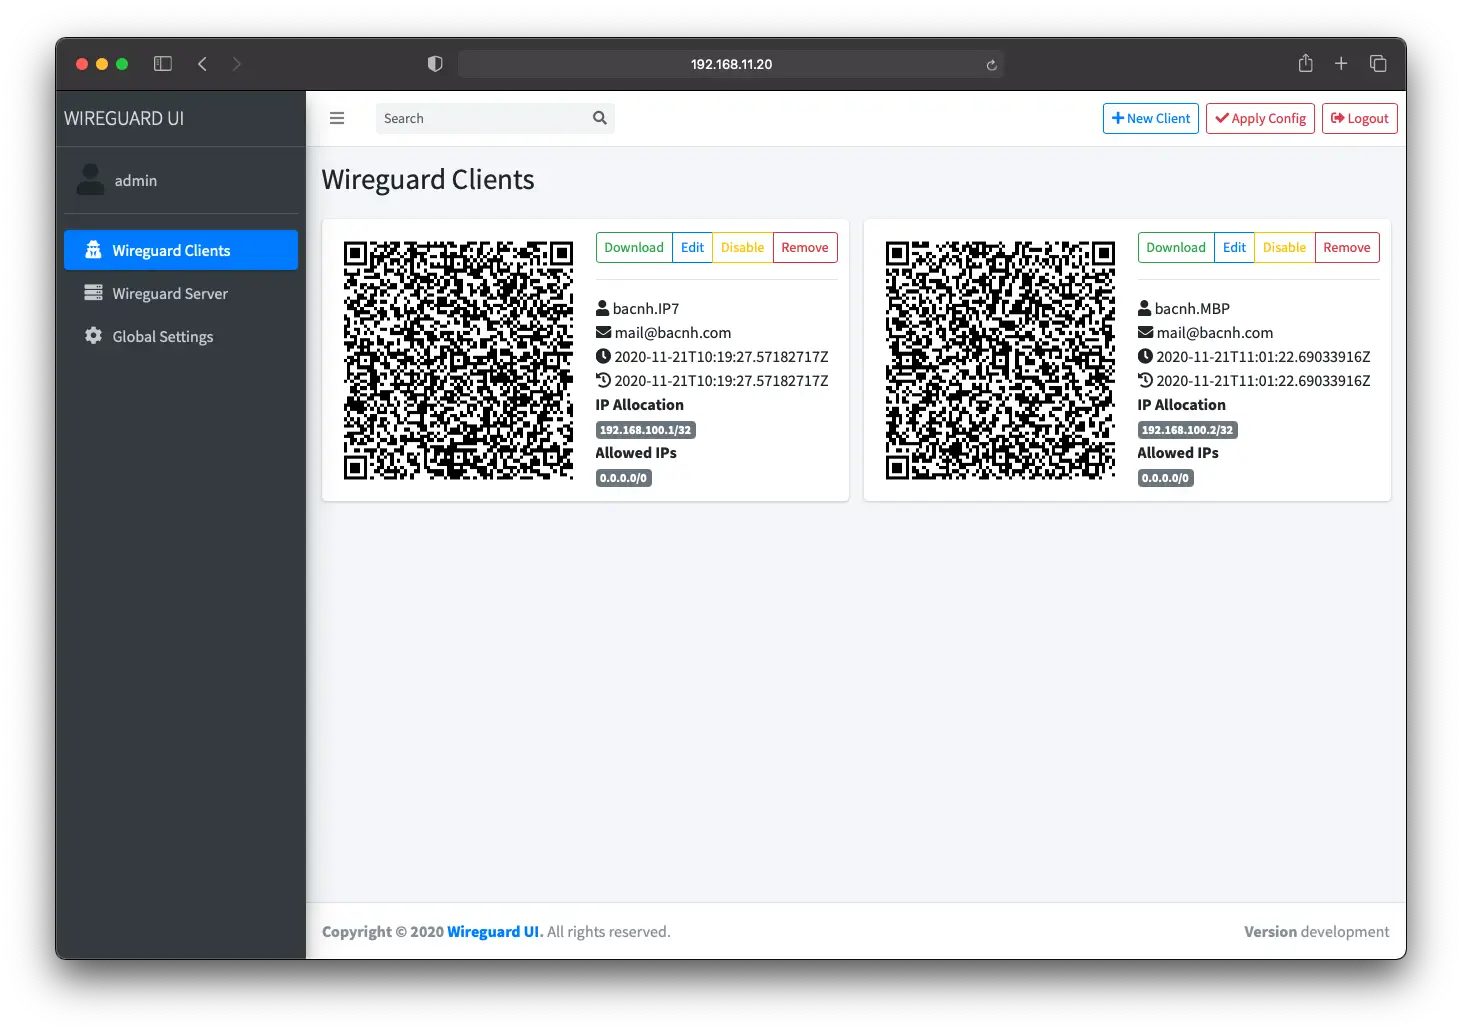
iptables-saveWireguard Clients
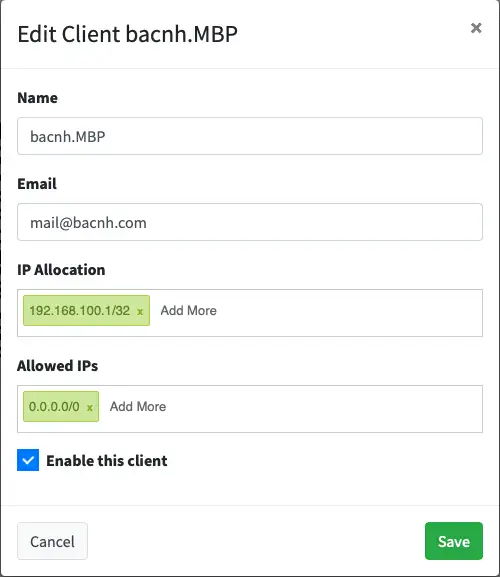
This tab, you can create peer configuration with important info:
- IP Allocation: which IP address is assigned to other peer via this tunner configuration
- Allowed IP: which IP in this VPN peer that other peer can see (
0.0.0.0/0- no limitation)
Note: After changing the configuration /etc/wireguard/wg0.conf, [email protected] need to be restart to load a new config.
sudo systemctl restart wg-quick@wg0Advanced configuration
There issue with approach using Wireguard Gui is that changing /etc/wireguard/wg0.conf does not reflect to WireGuard network interface where can be checked using:
$ sudo wg
Password:
interface: wg0
  public key: 7G1AyJHciXC/UZJbljX55pn7DqubbA/kbAlOAPDM2zs=
  private key: (hidden)
  listening port: 51820

peer: xEK3ZD6E2hJ02gzfIQnuYfU6OAonNKnC2c9O7R4FZmI=
  preshared key: (hidden)
  allowed ips: 192.168.100.1/32
Therefore, we need to have a service to monitor changes of this configuration and restart [email protected]. Thanks for the author, with little modification, create below respective systemd.service and systemd.path with same name.
# Create wgui.service
echo >/usr/lib/systemd/system/wgui.service <<EOF
[Unit]
Description=Restart WireGuard
After=network.target

[Service]
Type=oneshot
ExecStart=/usr/bin/systemctl restart [email protected]

[Install]
WantedBy=multi-user.target
EOF

# Create wgui.path
echo > /usr/lib/systemd/system/wgui.path << EOF
[Unit]
Description=Watch /etc/wireguard/wg0.conf for changes

[Path]
PathModified=/etc/wireguard/wg0.conf

[Install]
WantedBy=multi-user.target
EOF
Let's enable both and start services, then wgui.path will monitor WireGuard config changes and trigger wgui.service to restart [email protected].
systemctl enable wgui.{path,service}
systemctl start wgui.{path,service}
Then, compare between wg0.conf and current wg data to make sure it works.
Wireguard clients
Just download suitable WireGuard tools for client platform and I am able to connect to VPN server.
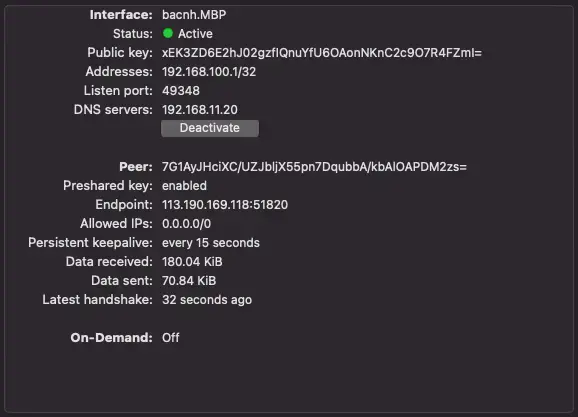
and able to see the connection data in the host:
sudo wg
Password:
interface: wg0
  public key: 7G1AyJHciXC/UZJbljX55pn7DqubbA/kbAlOAPDM2zs=
  private key: (hidden)
  listening port: 51820

peer: xEK3ZD6E2hJ02gzfIQnuYfU6OAonNKnC2c9O7R4FZmI=
  preshared key: (hidden)
  endpoint: 192.168.11.1:49348
  allowed ips: 192.168.100.1/32
  latest handshake: 48 seconds ago
  transfer: 269.90 KiB received, 415.38 KiB sent

peer: ZLxUmJeghoEEYddFUw35+30gmu0QQwQd4Larvl0QD0U=
  preshared key: (hidden)
  allowed ips: 192.168.100.2/32
Good luck!


